Our Featured
Products
|
view how many days your order will take
|
|
|
Quick Contact
|
|
|
|
|
|
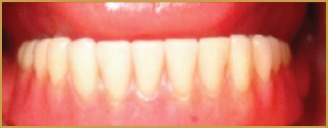
Screw-Retained Hybrid Denture Abutment/ Implant CAD/CAM Titanium/Acrylic
1st Appointment
Preliminary Abutment Level/Implant Impression
-
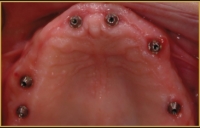
Abutments may be required due to the implant inclination or if there is an excessive soft tissue thickness. In these cases, the
appropriate height and angled abutments should be seated on the implants and an abutment level impression made.
- Remove the healing abutment from the implants.
- Seat and tighten the abutments to the recommended torque. (Fig. 1)
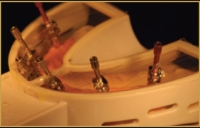
- Seat open tray abutment impression copings on abutment and tighten.
- Take an abutment level impression, including the palate and vestibules, using a Mira Tray. (Fig. 2)
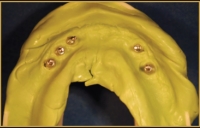
- Once set, loosen the guide pins and pull the impression. (Fig. 3) The abutments stay in the mouth.
-
Seat abutment healing caps on the abutments.
Note: All procedures will be done at the abutment level rather than at the
implant level. This avoids having taking the abutments on and off for every
appointment.
- Take an impression of opposing dentition as well as the denture to be replaced.
- Send the impression with your lab Rx to Miracle.
2nd Appointment
Jaw Relation Records, Shade Selection and Implant
Verification Appliance.
-
To ensure a passive fit of your custom-milled framework, it is vital to get
an accurate analog model. You will receive a screw retained bite block. The
following procedures should be followed to ensure an accurate analog model.
Jaw Relation Records
-
Remove abutment healing caps. Seat the bite block on the implants and tighten
the cylinder screws (Fig 4).
-
With the patient sitting up, use conventional denture techniques to achieve
accurate jaw relation records.
- For maxillary cases, shape the rim for lip contour-place a small amount of Vaseline on the labial aspect of the wax rim and confirm.
- With the patient facing toward you, mark the midline, high lip line and corners of the mouth in the wax rim. From a profile view, evaluate the mid-face support.
- Determine centric relations and (record passively) vertical dimension of occlusion (VDO). Note: The patient’s existing denture should he evaluated and can be utilized as a benchmark in determining the new VDO.
- Place a dot with indelible marker on the tip of the patient’s nose and chin.
-
Have the patient lick their lips, swallow, then relax their jaw. Measure the distance between the two dots. Repeat this
procedure 3-4 times until you obtain a consistent vertical dimension at rest measurement (VDR).
-
Have the patient bite together gently. The measurement should be approximately 3 mm less vertical measurement at
rest. Adjust the rims, if necessary, so they meet evenly.
-
There should be a 2-4 mm speaking space between the rims when the patient pronounces ‘S’ sounds (e.g., Mississippi,
sixty, sixty-one, etc.) The incisal edges of the maxillary central incisors should lightly touch the top of the lower lip
during “f’ sounds (e.g., forty, forty-one, etc,).
- Once the VDO and a verifiable, repeatable CR are established, inject bite registration material onto the top of the wax rim
and into the notches on the bite block. Have the patient bite together gently but completely
- Unscrew the bite block.
 |
| Fig. 4 |
Shade Selection
-
Select denture tooth shade and mould. The study model of the patient’s
existing denture can be used as a reference regarding the size and shape
of the new teeth.
Note: We will match to Mondial, premium denture teeth unless otherwise
directed on Rx.
- Screw down implant verification appliance. (Fig. 5)
- Appliance should seat passively (no rocking).
- X-Ray fit.
- If not seated passively cut between implants where fit is incorrect.
- Cut should not be too wide
- Retighten screws.
- Rebond with 3M secure hard pickup material (self curing) (Fig. 6)
- Take new pickup impression.
- Use Mira Tray to retake impression.
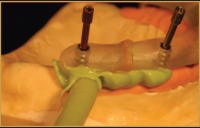
- Inject medium body under jig to capture all anatomical landmarks. (Fig. 7)
- Push screw through cellophane on Mira Tray. (Fig. 1)
- Once the material has set, remove guide pins and carefully pull the impression and the final impression containing the jig. Note: The verification jig is picked-up in the impression.
- Reseat and tighten the healing caps onto the abutments.
- Return the case to Miracle enclosing all components, models.
3rd Appointment
Trial Set-Up Try-In
You will receive from Miracle Lab: trial denture with temporary cylinders.
- Remove abutment healing caps.
- Seat the trail denture and tighten prosthetic screws.
-
Evaluate CR, VDO, occlusion, esthetic/shade, tooth arrangement and phonetics including “f’ and “s” sounds as well as the
midline (Fig 9). Change the set-up if necessary or note the requested changes on the lab Rx. If CR is incorrect, a new bite
registration should be taken.
- Please take photos.
- Remove the trial denture and replace the healing caps.
- Return the case to Miracle lab.
Fourth Appointment
Framework/Trial Set-Up Try-In
You will receive from Miracle: trial denture set-up on the titanium framework.
- Remove abutment healing caps.
- Seat the trial prosthesis.
-
Evaluate the fit of framework. Tighten one screw and verify a passive fit on
all abutments (no lifting of the framework). Remove the screw and repeat the
process for each abutment. (Fig. 8)
-
Re-evaluate the VDO, CR, occlusion, esthetic/shade, tooth arrangement,
phonetics and midline.
- Remove the trial prosthesis and replace the healing caps.
- Return the case to Miracle Dental Lab.
 |
| Fig. 8 |
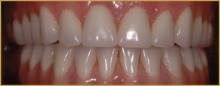
Fifth Appointment
Delivery of Final Prosthesis
You will receive from Miracle Lab the final-prosthesis.
- Remove abutment healing caps.
- Seat the prosthesis on the abutments.
- Hand tighten the prosthetic screws, alternating from one side to the other.
-
Tighten the screws to the appropriate torque. Wait approximately
5 minutes and re-torque the screws.
- Check the occlusion, Make adjustments as necessary. (Fig. 9)
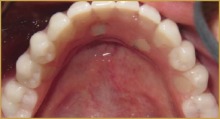
-
Place a cotton pellet or piece of plumbers tape over the head of the screw
and seal the opening with composite or acrylic. (Fig. 10)
 |
 |
| Fig. 9 |
Fig. 10 |
One Week Follow-Up Check
- Check occlusion.
- Review oral hygiene instructions.
-
Take impression for Bruxese appliance, send to Miracle, delivered back to
you in one week.
- Set recall schedule.
Schedule
|
Doctor |
Miracle |
| 1st Appointment |
Take preliminary impression of edentulous arch and opposing dentition as well as the denture to be placed. |
Pour models, fabricate bite block, impression verification appliance. (3 days) |
| 2nd Appointment |
Obtain jaw relation records, select denture tooth shade and mold. Try in impression verification appliance. |
Articulate models, set denture teeth in wax. (3 days) |
| 3rd Appointment |
Trial denture set-up try-in and photos |
Fabricate titanium framework, reset denture teeth on framework. (15-21-days). |
| 4th Appointment |
Combination framework/set-up try-in. |
Process acrylic and denture teeth to the framework. (3 days). |
| 5th Appointment |
Final delivery of prosthesis. |
|
| 6th Appointment |
Check occlusion, take impression for Bruxese Appliance. |
|
Please allow 2 days for pick-up and delivery.
back to products page
|