Our Featured
Products
|
view how many days your order will take
|
|
|
Quick Contact
|
|
|
|
|
|
Implant Overdentures Utilizing Locator Direct Abutment
Free-standing attachments used to retain overdentures provide numerous advantages, including enhanced
esthetics, phonetics, as well as ease of maintenance and simplified hygiene. This type of prosthesis is primarily
tissue-borne with the implants providing retention and stability. Therefore, successful treatment begins with
conforming to standard denture fabrication principles. This includes ideal border adaptation, extension and
full denture occlusion, with an ideal tooth set-up and try-in, to allow evaluation of esthetics, phonetics and
support. Typically, the case should be taken through the denture try-in stage to determine the ideal positions
of the implants. However, this may not always be the case. This brief instruction guide follows the steps if the
overdenture is to be fabricated post-implantation.
*Order Mira Trays (see flyer) and all open tray impression posts and analogs before appointment.
1st Appointment
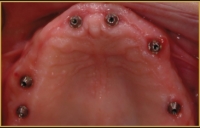
- Remove healing abutments from implants. (Fig.1)
- Seat open-tray impression coping on the implants and tighten
the guide pins (take a PA, to verify complete seating). Check the
Mira Tray for fit. There should be no contact with the impression
copings. The heads of the guide pins should extend through Mira
Tray, trim if necessary (Fig . 2).
- Utilizing the Mira Tray. Border mould and take an implant level
impression, including the palate and vestibules (Fig. 3). Once
the material has set, remove the guide pins and carefully pull the
impression. Inspect the impression for the required details.
- Take and pour an alginate impression of the opposing dentition as
well as the denture to be replaced.
- Replace the healing abutments.
- Send in the case with a lab script that identifies the brand, type
and diameter of the implants.
Note: A Locator core tool will be required for the next
appointment. The torque wrench will be needed for
final delivery.
2nd Appointment
*You will receive from Miracle Dental Lab a cast mesh
framework with bite block and caps.
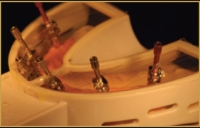
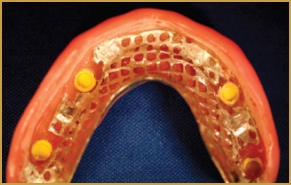
- Remove the healing abutments from the implants.
- Tighten the locator abutments into the same implants as they
are in the model with the Core tool. (Fig. 4)
- Seat the bite block (Fig. 5)
Note: This may require significant pressure to engage
the attachments.
- With the patient sitting up, use conventional denture
technique to achieve accurate jaw relation record.
Note: The patient’s existing denture should be evaluated and
can be utilized as a benchmark in determining the new VDO.
- For maxillary cases, shape the rim for lip contour - place a small amount of Vaseline on the labial aspect of the wax rim and confirm.
- With the patient facing toward you, mark the midline, high lip line and corners of the mouth in the wax rim. Move the central incisors as necessary.
- Determine centric relation and the vertical dimension of occlusion (VDO).
- Place a dot with an indelible marker on the tip of the patient’s nose and chin.
- Have the patient lick their lips, swallow, and then relax their jaw. Measure the distance between
the two dots. Repeat this procedure 3-4- times until you obtain a consistence vertical dimension
at rest measurement (VDR).
- Have the patient bite together gently. The measurement should be approximately 3 mm less than
the vertical measurement at rest. Adjust the rims, if necessary, so they meet evenly.
- There should be 2-4 mm speaking space between the rims when the patient pronounces “S”
sounds (e.g., Mississippi, sixty, sixty-one, etc.). The incisal edges of the central incisors should
lightly touch the lower lip during “f’ sounds, (e.g., forty, forty-one, etc.).
- Once the VDO and a verifiable, repeatable CR are established, inject bite registration material onto
the top of the wax rim and into the notches on the bite block. Use an excess amount on the anterior
labial area. Have the patient bite together gently but completely.
- Optional - A cotton swab stick embedded in the excess labial registration material parallel to the
pupils can be used to represent horizontal plane.
- Remove the bite blocks and Locator abutments. Reseat and tighten the healing abutments on the
implants. Thread the Locator Abutments back onto their correct location on the model.
- Select the shade and mould of the denture teeth. The study model of the patient’s existing denture
can be used as a reference regarding the size and shape of the new teeth.
- Send the entire case, including the models with the Locators abutments and the bite blocks
 |
 |
| Fig. 4 |
Fig. 5 |
Third Appointment
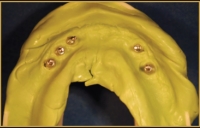
* You will receive from Miracle Dental Lab, a trial overdenture with Locator cap and a master model
with Locator abutments.
- Remove healing abutments.
- Tighten the Locator abutments into the implants with the
Core tool and seat trial denture (denture base plate with teeth
in wax) (Fig. 6)
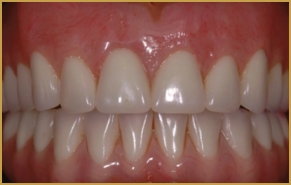
- Evaluate CR, VDO, occlusion, esthetic/shade, tooth
arrangement and phonetics including “f’ and “s” sounds as
well as the midline. Change the set-up if necessary or note
the requested changes on the lab Rx. If CR is incorrect, a new
bite registration should be taken.
- Please take photos.
- Remove the trial denture and Locator abutments. Thread the
Locator Abutments back onto their correct location on the model.
- Reseat and tighten the healing abutments.
 |
| Fig. 6 |
Forth Appointment
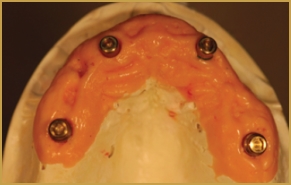
*You will receive from Miracle Dental Lab an overdenture with processing Locator caps and a master
model with Locator abutments.
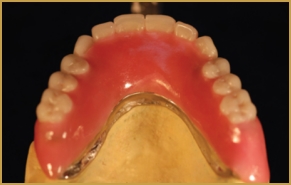
- Remove healing abutments.
- Tighten the Locator abutments using the recommended torque
with the Core tool and Torque Wrench into the implants, and
deliver the final denture.
- Evaluate fit and occlusion (Fig. 7).
Make adjustments as necessary.
 |
| Fig. 7 |
One Week Follow-Up Check
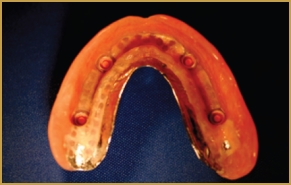
- Change out the black caps for appropriate retention caps
(the Locator Coring Tool is required). (Fig. 8)
Note: the amount of retention should be based on the number of
implants and the strength of the patient. The black caps are not
intended for long-term use.
- Check the occlusion and adjust as necessary.
- Relieve any sore spots.
 |
| Fig. 8 |
Schedule
|
Doctor |
Miracle |
| 1st Appointment |
Final implant level impression, impression of opposing dentition as well as the denture to be replaced. |
Pour models, select Locator abutments, fabricate bite block with cast mesh base (8 days). |
| 2nd Appointment |
Jaw relation records and
select tooth shade/mold. |
Articulate models, set denture
teeth in wax (3 days). |
| 3rd Appointment |
Trial denture wax try-in and photos. |
Process denture incorporating Locator processing caps (4 days). |
| 4th Appointment |
Final prosthetic delivery. |
|
| One week post delivery check: |
Change Locator caps if necessary,
check occlusion, relieve ant sore sport. |
|
back to products page
|